docker network create jenkinsDocker
Table of Contents
Docker is a platform for running applications in an isolated environment called a "container" (or Docker container). Applications like Jenkins can be downloaded as read-only "images" (or Docker images), each of which is run in Docker as a container. A Docker container is in effect a "running instance" of a Docker image. From this perspective, an image is stored permanently more or less (i.e. insofar as image updates are published), whereas containers are stored temporarily. Read more about these concepts in the Docker documentation’s Getting Started, Part 1: Orientation and setup page.
Docker’s fundamental platform and container design means that a single Docker image (for any given application like Jenkins) can be run on any supported operating system (macOS, Linux and Windows) or cloud service (AWS and Azure) which is also running Docker.
Installing Docker
To install Docker on your operating system, follow "prerequisites" section of the Guided Tour page
As an alternative solution you can visit the Dockerhub and select the Docker Community Edition suitable for your operating system or cloud service. Follow the installation instructions on their website.
|
If you are installing Docker on a Linux-based operating system, ensure you configure Docker so it can be managed as a non-root user. Read more about this in Docker’s Post-installation steps for Linux page of their documentation. This page also contains information about how to configure Docker to start on boot. |
Prerequisites
Minimum hardware requirements:
-
256 MB of RAM
-
1 GB of drive space (although 10 GB is a recommended minimum if running Jenkins as a Docker container)
Recommended hardware configuration for a small team:
-
4 GB+ of RAM
-
50 GB+ of drive space
Comprehensive hardware recommendations:
-
Hardware: see the Hardware Recommendations page
Software requirements:
-
Java: see the Java Requirements page
-
Web browser: see the Web Browser Compatibility page
-
For Windows operating system: Windows Support Policy
-
For Linux operating system: Linux Support Policy
Downloading and running Jenkins in Docker
There are several Docker images of Jenkins available.
The recommended Docker image to use is the Official
jenkins/jenkins image
(from the Docker Hub repository). This image
contains the current Long-Term Support (LTS) release of Jenkins
(which is production-ready). However this image doesn’t have docker CLI inside it
and is not bundled with frequently used Blue Ocean plugins and features.
This means that if you want to use the full power of Jenkins and Docker you may want
to go through described below installation process.
|
A new |
On macOS and Linux
-
Open up a terminal window.
-
Create a bridge network in Docker using the following
docker network createcommand: -
In order to execute Docker commands inside Jenkins nodes, download and run the
docker:dindDocker image using the followingdocker runcommand:docker run \ --name jenkins-docker \(1) --rm \(2) --detach \(3) --privileged \(4) --network jenkins \(5) --network-alias docker \(6) --env DOCKER_TLS_CERTDIR=/certs \(7) --volume jenkins-docker-certs:/certs/client \(8) --volume jenkins-data:/var/jenkins_home \(9) --publish 2376:2376 \(10) docker:dind \(11) --storage-driver overlay2(12)1 ( Optional ) Specifies the Docker container name to use for running the image. By default, Docker will generate a unique name for the container. 2 ( Optional ) Automatically removes the Docker container (the instance of the Docker image) when it is shut down. 3 ( Optional ) Runs the Docker container in the background. This instance can be stopped later by running docker stop jenkins-docker.4 Running Docker in Docker currently requires privileged access to function properly. This requirement may be relaxed with newer Linux kernel versions. 5 This corresponds with the network created in the earlier step. 6 Makes the Docker in Docker container available as the hostname dockerwithin thejenkinsnetwork.7 Enables the use of TLS in the Docker server. Due to the use of a privileged container, this is recommended, though it requires the use of the shared volume described below. This environment variable controls the root directory where Docker TLS certificates are managed. 8 Maps the /certs/clientdirectory inside the container to a Docker volume namedjenkins-docker-certsas created above.9 Maps the /var/jenkins_homedirectory inside the container to the Docker volume namedjenkins-data. This will allow for other Docker containers controlled by this Docker container’s Docker daemon to mount data from Jenkins.10 ( Optional ) Exposes the Docker daemon port on the host machine. This is useful for executing dockercommands on the host machine to control this inner Docker daemon.11 The docker:dindimage itself. This image can be downloaded before running by using the command:docker image pull docker:dind.12 The storage driver for the Docker volume. See "Docker storage drivers" for supported options. Note: If copying and pasting the command snippet above does not work, try copying and pasting this annotation-free version here:
docker run --name jenkins-docker --rm --detach \ --privileged --network jenkins --network-alias docker \ --env DOCKER_TLS_CERTDIR=/certs \ --volume jenkins-docker-certs:/certs/client \ --volume jenkins-data:/var/jenkins_home \ --publish 2376:2376 \ docker:dind --storage-driver overlay2 -
Customise official Jenkins Docker image, by executing below two steps:
-
Create Dockerfile with the following content:
FROM jenkins/jenkins:2.332.1-jdk11 USER root RUN apt-get update && apt-get install -y lsb-release RUN curl -fsSLo /usr/share/keyrings/docker-archive-keyring.asc \ https://download.docker.com/linux/debian/gpg RUN echo "deb [arch=$(dpkg --print-architecture) \ signed-by=/usr/share/keyrings/docker-archive-keyring.asc] \ https://download.docker.com/linux/debian \ $(lsb_release -cs) stable" > /etc/apt/sources.list.d/docker.list RUN apt-get update && apt-get install -y docker-ce-cli USER jenkins RUN jenkins-plugin-cli --plugins "blueocean:1.25.3 docker-workflow:1.28" -
Build a new docker image from this Dockerfile and assign the image a meaningful name, e.g. "myjenkins-blueocean:2.332.1-1":
docker build -t myjenkins-blueocean:2.332.1-1 .Keep in mind that the process described above will automatically download the official Jenkins Docker image if this hasn’t been done before.
-
-
Run your own
myjenkins-blueocean:2.332.1-1image as a container in Docker using the followingdocker runcommand:docker run \ --name jenkins-blueocean \(1) --rm \(2) --detach \(3) --network jenkins \(4) --env DOCKER_HOST=tcp://docker:2376 \(5) --env DOCKER_CERT_PATH=/certs/client \ --env DOCKER_TLS_VERIFY=1 \ --publish 8080:8080 \(6) --publish 50000:50000 \(7) --volume jenkins-data:/var/jenkins_home \(8) --volume jenkins-docker-certs:/certs/client:ro \(9) myjenkins-blueocean:2.332.1-1 (10)1 ( Optional ) Specifies the Docker container name for this instance of the Docker image. 2 ( Optional ) Automatically removes the Docker container when it is shut down. 3 ( Optional ) Runs the current container in the background (i.e. "detached" mode) and outputs the container ID. If you do not specify this option, then the running Docker log for this container is output in the terminal window. 4 Connects this container to the jenkinsnetwork defined in the earlier step. This makes the Docker daemon from the previous step available to this Jenkins container through the hostnamedocker.5 Specifies the environment variables used by docker,docker-compose, and other Docker tools to connect to the Docker daemon from the previous step.6 Maps (i.e. "publishes") port 8080 of the current container to port 8080 on the host machine. The first number represents the port on the host while the last represents the container’s port. Therefore, if you specified -p 49000:8080for this option, you would be accessing Jenkins on your host machine through port 49000.7 ( Optional ) Maps port 50000 of the current container to port 50000 on the host machine. This is only necessary if you have set up one or more inbound Jenkins agents on other machines, which in turn interact with your jenkins-blueoceancontainer (the Jenkins "controller"). Inbound Jenkins agents communicate with the Jenkins controller through TCP port 50000 by default. You can change this port number on your Jenkins controller through the Configure Global Security page. If you were to change the TCP port for inbound Jenkins agents of your Jenkins controller to 51000 (for example), then you would need to re-run Jenkins (via thisdocker run …command) and specify this "publish" option with something like--publish 52000:51000, where the last value matches this changed value on the Jenkins controller and the first value is the port number on the machine hosting the Jenkins controller. Inbound Jenkins agents communicate with the Jenkins controller on that port (52000 in this example). Note that WebSocket agents do not need this configuration.8 Maps the /var/jenkins_homedirectory in the container to the Docker volume with the namejenkins-data. Instead of mapping the/var/jenkins_homedirectory to a Docker volume, you could also map this directory to one on your machine’s local file system. For example, specifying the option
--volume $HOME/jenkins:/var/jenkins_homewould map the container’s/var/jenkins_homedirectory to thejenkinssubdirectory within the$HOMEdirectory on your local machine, which would typically be/Users/<your-username>/jenkinsor/home/<your-username>/jenkins. Note that if you change the source volume or directory for this, the volume from thedocker:dindcontainer above needs to be updated to match this.9 Maps the /certs/clientdirectory to the previously createdjenkins-docker-certsvolume. This makes the client TLS certificates needed to connect to the Docker daemon available in the path specified by theDOCKER_CERT_PATHenvironment variable.10 The name of the Docker image, which you built in the previous step. Note: If copying and pasting the command snippet above does not work, try copying and pasting this annotation-free version here:
docker run --name jenkins-blueocean --rm --detach \ --network jenkins --env DOCKER_HOST=tcp://docker:2376 \ --env DOCKER_CERT_PATH=/certs/client --env DOCKER_TLS_VERIFY=1 \ --publish 8080:8080 --publish 50000:50000 \ --volume jenkins-data:/var/jenkins_home \ --volume jenkins-docker-certs:/certs/client:ro \ myjenkins-blueocean:2.332.1-1 -
Proceed to the Post-installation setup wizard.
On Windows
The Jenkins project provides a Linux container image, not a Windows container image.
Be sure that your Docker for Windows installation is configured to run Linux Containers rather than Windows Containers.
See the Docker documentation for instructions to switch to Linux containers.
Once configured to run Linux Containers, the steps are:
-
Open up a command prompt window and similar to the macOS and Linux instructions above do the following:
-
Create a bridge network in Docker
docker network create jenkins -
Run a docker:dind Docker image
docker run --name jenkins-docker --rm --detach ^ --privileged --network jenkins --network-alias docker ^ --env DOCKER_TLS_CERTDIR=/certs ^ --volume jenkins-docker-certs:/certs/client ^ --volume jenkins-data:/var/jenkins_home ^ --publish 2376:2376 ^ docker:dind -
Customise official Jenkins Docker image, by executing below two steps:
-
Create Dockerfile with the following content:
FROM jenkins/jenkins:2.332.1-jdk11 USER root RUN apt-get update && apt-get install -y lsb-release RUN curl -fsSLo /usr/share/keyrings/docker-archive-keyring.asc \ https://download.docker.com/linux/debian/gpg RUN echo "deb [arch=$(dpkg --print-architecture) \ signed-by=/usr/share/keyrings/docker-archive-keyring.asc] \ https://download.docker.com/linux/debian \ $(lsb_release -cs) stable" > /etc/apt/sources.list.d/docker.list RUN apt-get update && apt-get install -y docker-ce-cli USER jenkins RUN jenkins-plugin-cli --plugins "blueocean:1.25.3 docker-workflow:1.28" -
Build a new docker image from this Dockerfile and assign the image a meaningful name, e.g. "myjenkins-blueocean:2.332.1-1":
docker build -t myjenkins-blueocean:2.332.1-1 .Keep in mind that the process described above will automatically download the official Jenkins Docker image if this hasn’t been done before.
-
-
Run your own
myjenkins-blueocean:2.332.1-1image as a container in Docker using the followingdocker runcommand:docker run --name jenkins-blueocean --rm --detach ^ --network jenkins --env DOCKER_HOST=tcp://docker:2376 ^ --env DOCKER_CERT_PATH=/certs/client --env DOCKER_TLS_VERIFY=1 ^ --volume jenkins-data:/var/jenkins_home ^ --volume jenkins-docker-certs:/certs/client:ro ^ --publish 8080:8080 --publish 50000:50000 myjenkins-blueocean:2.332.1-1 -
Proceed to the Setup wizard.
Accessing the Docker container
If you have some experience with Docker and you wish or need to access your
Docker container through a terminal/command prompt using the
docker exec
command, you can add an option like --name jenkins-tutorial to the docker exec command.
That will access the Jenkins Docker container named "jenkins-tutorial".
This means you could access your docker container (through a separate
terminal/command prompt window) with a docker exec command like:
docker exec -it jenkins-blueocean bash
Accessing the Docker logs
There is a possibility you may need to access the Jenkins console log, for instance, when Unlocking Jenkins as part of the Post-installation setup wizard.
The Jenkins console log is easily accessible through the terminal/command
prompt window from which you executed the docker run … command.
In case if needed you can also access the Jenkins console log through the
Docker logs of
your container using the following command:
docker logs <docker-container-name>
Your <docker-container-name> can be obtained using the docker ps command.
Accessing the Jenkins home directory
There is a possibility you may need to access the Jenkins home directory, for
instance, to check the details of a Jenkins build in the workspace
subdirectory.
If you mapped the Jenkins home directory (/var/jenkins_home) to one on your
machine’s local file system (i.e. in the docker run … command
above), then you can access the
contents of this directory through your machine’s usual terminal/command prompt.
Otherwise, if you specified the --volume jenkins-data:/var/jenkins_home option in
the docker run … command, you can access the contents of the Jenkins home
directory through your container’s terminal/command prompt using the
docker container exec
command:
docker container exec -it <docker-container-name> bash
As mentioned above,
your <docker-container-name> can be obtained using the
docker container ls
command. If you specified the
--name jenkins-blueocean option in the docker container run …
command above (see also
Accessing the Jenkins/Blue
Ocean Docker container), you can simply use the docker container exec command:
docker container exec -it jenkins-blueocean bash
Post-installation setup wizard
After downloading, installing and running Jenkins using one of the procedures above (except for installation with Jenkins Operator), the post-installation setup wizard begins.
This setup wizard takes you through a few quick "one-off" steps to unlock Jenkins, customize it with plugins and create the first administrator user through which you can continue accessing Jenkins.
Unlocking Jenkins
When you first access a new Jenkins instance, you are asked to unlock it using an automatically-generated password.
-
Browse to
http://localhost:8080(or whichever port you configured for Jenkins when installing it) and wait until the Unlock Jenkins page appears.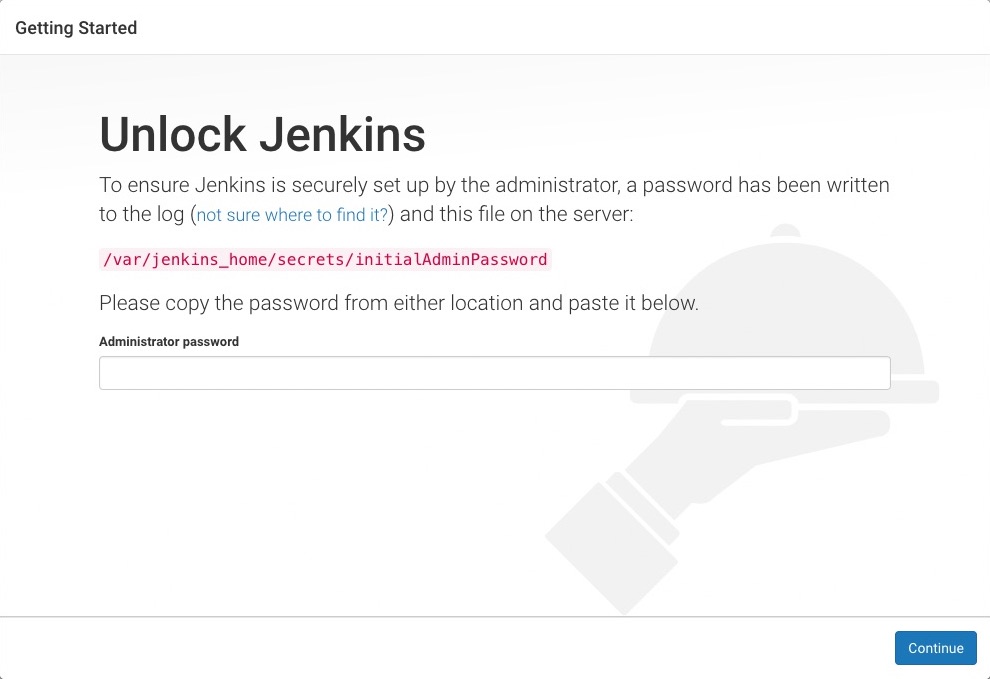
-
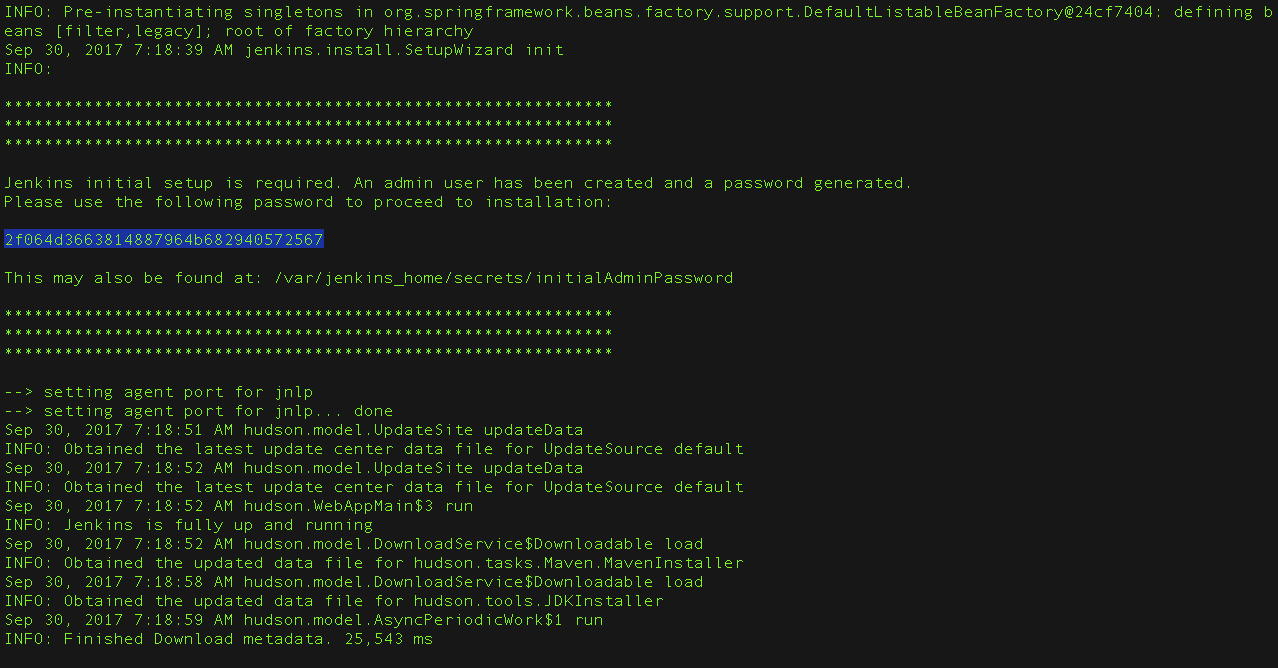
From the Jenkins console log output, copy the automatically-generated alphanumeric password (between the 2 sets of asterisks).
Note:-
The command:
sudo cat /var/lib/jenkins/secrets/initialAdminPasswordwill print the password at console. -
If you are running Jenkins in Docker using the official
jenkins/jenkinsimage you can usesudo docker exec ${CONTAINER_ID or CONTAINER_NAME} cat /var/jenkins_home/secrets/initialAdminPasswordto print the password in the console without having to exec into the container.
-
-
On the Unlock Jenkins page, paste this password into the Administrator password field and click Continue.
Notes:-
You can always access the Jenkins console log from the Docker logs (above).
-
The Jenkins console log indicates the location (in the Jenkins home directory) where this password can also be obtained. This password must be entered in the setup wizard on new Jenkins installations before you can access Jenkins’s main UI. This password also serves as the default administrator account’s password (with username "admin") if you happen to skip the subsequent user-creation step in the setup wizard.
-
Customizing Jenkins with plugins
After unlocking Jenkins, the Customize Jenkins page appears. Here you can install any number of useful plugins as part of your initial setup.
Click one of the two options shown:
-
Install suggested plugins - to install the recommended set of plugins, which are based on most common use cases.
-
Select plugins to install - to choose which set of plugins to initially install. When you first access the plugin selection page, the suggested plugins are selected by default.
| If you are not sure what plugins you need, choose Install suggested plugins. You can install (or remove) additional Jenkins plugins at a later point in time via the Manage Jenkins > Manage Plugins page in Jenkins. |
The setup wizard shows the progression of Jenkins being configured and your chosen set of Jenkins plugins being installed. This process may take a few minutes.
Creating the first administrator user
Finally, after customizing Jenkins with plugins, Jenkins asks you to create your first administrator user.
-
When the Create First Admin User page appears, specify the details for your administrator user in the respective fields and click Save and Finish.
-
When the Jenkins is ready page appears, click Start using Jenkins.
Notes:-
This page may indicate Jenkins is almost ready! instead and if so, click Restart.
-
If the page does not automatically refresh after a minute, use your web browser to refresh the page manually.
-
-
If required, log in to Jenkins with the credentials of the user you just created and you are ready to start using Jenkins!
Please submit your feedback about this page through this quick form.
Alternatively, if you don't wish to complete the quick form, you can simply indicate if you found this page helpful?
See existing feedback here.